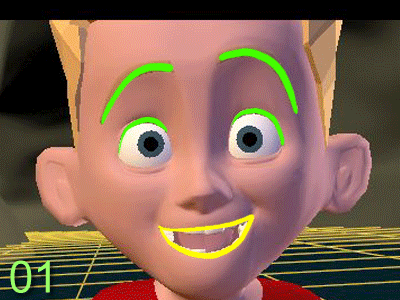
 Here is my first (and possibly last) attempt at an animation tutorial. I break down a 10 frame shot from The Incredibles to show how I used squash and stretch, etc. in a facial take. Enjoy!
Thursday, September 21, 2006
New Tutorial Up!
Here is my first (and possibly last) attempt at an animation tutorial. I break down a 10 frame shot from The Incredibles to show how I used squash and stretch, etc. in a facial take. Enjoy!
Subscribe to:
Post Comments (Atom)
naw man, you gotta do more toot's--er, i mean, tutorials! You guys made those CG models feel like drawings-- i love it!
ReplyDeleteThanks for the fine tutorial, this is gold. Your point about "asymmetrical timing" is awesome. Gonna put that up on a post-it right now..!
ReplyDeleteVictor, great tutorial. Much appreciated. I learned something, and yeah... you gotta make more!
ReplyDeleteWow Victor, I learned something from every single frame! I just wish I would have seen this before I started rendering my short! I might have to go back and take a look at my "takes", this really showed me how much I have to learn. So informative and humbling too. Thanks so much for posting it!
ReplyDeleteGreat toturial and thanks for sharing!
ReplyDeleteIt all makes sense and it's easy to understand, you should definitely do more of these!!! The shrinking of iris has a great effect btw. I'm really inspired to dust off the good 'ol A:M, though I've been told I should spend my time, learning one of the bigger programs instead. I like the simplicity of A:M, but I think it lacks some more complex characters to play with. Not that you need complex models to make good animation, but I'm a fan of subtle facial movements and acting.
Is Marionette comparable with any of the other big programs, like Maya, 3ds Max or Lightwave?
Thanks again and have a great weekend,
Hans
Hey Victor
ReplyDeletethanks for posting this
frame by frame look at this shot!!
It really shows the time and thought
that goes into every frame
of good animation.
This is so COOL! Thank you, thank you, thank you! :o)
ReplyDeletehans- I'm using A:M right now! :)
I too was looking for a complex character to play around with, so I started helping on the TWO movie that the A:M community is making right now and I've gotta say there are some wonderful characters in there! You should come check it out (and if you wanted we could definitely use more animators on the movie)!
Anyways, thanks so much Victor!
Just awesome!! Thank you.
ReplyDeleteI wouldn't be opposed to more delicious tutorials!
ReplyDeleteAWESOME! Can't thank you enough for posting that. Great stuff. I would love to see more.
ReplyDeleteGreat start Victor.
ReplyDeleteCome on do more and enrich ur self more.
Nice tutorial.Thanks.
Awesome Victor, thank you so much for this tutorial. I can't wait to apply these relationships to my shot later today. I really admire your work. Thanks again.
ReplyDeleteThe markups over the face made it very clear to see what was happening. Great Job, I hope this wont be the last. Thanks so much.
ReplyDeletePLEASE don't let this be the last time you do this Victor, its great stuff!
ReplyDeletehey, you're tutorials are fantastic!! please do some more if you get the time - they're pure gold! the incredibles are definitely up there with the best 3D animation i've ever seen - and you're breaking down of even that short moment just proves how much work went into it - please please give us some more insight!!!! you're brilliant!
ReplyDeleteSweet mother of Mary I've struck gold!Thanks for posting Victor! I love the attention to detail and the in depth analysis! Definitely keep these coming!
ReplyDeleteVery good tutorial! Thank you Victor.
ReplyDeleteWow! I love this tutorial! Thanks a lot victor and please keep them coming!
ReplyDeletePlease sir...I want some more.
ReplyDeleteThanks SO much for taking the time to put this together. Your site is definitely a great destination for the animation community.
ReplyDeleteI just wanted to say thinks for posting this tutorial online. I am a sr. at Ringling School of Art and design and this is really helping me try an push my blendshapes.
ReplyDeleteAwesome work to, love all the different ways the guy falls at the end of “The Incredibles” showreel
Please add more cool little Pixary tutorials - that was a great insight :)
ReplyDeleteThanks very much from across the pond!
As others have said too, thanks for doing this! There are tons of tutorials out there for rigging, modeling, and other things, but no great breakdowns like this for animators.
ReplyDeleteI think one of the interesting and helpful tips you gave was how the curve of the eyelids mimick that of the brow--and the reversal of the eyelid curve when they open. I wish the rigs I animate had that much control so I could put that into practice!
Oh yeah, one more thing...please don't let it be the last! ;)
ReplyDeleteMan thats cool!!!
ReplyDeleteand you cannot fathom how jealous I am of you! >.<
Great tutorial, thanks for sharing
ReplyDeleteOnly a few years late in posting a comment, but likewise, this is amazing! I'm pretty sure people pay good money to see amazing breakdowns of shots like this. Wish you could do more, but I understand if you dont :)
ReplyDeleteThanks so much!
Nate
I found it cool, informative and funny also. Great tutorial. I learned new technique and also it made me smile..:-)
ReplyDeleteCG tutorials